When patient requires transfusion or blood on standby, compatibility testing will have to be done.
There are 2 kinds of compatibility testing. Namely, Abbreviated crossmatch (AXM) or extended crossmatch (EXM)
Extended crossmatch will have to be performed when:
1) patient has history of significant red cell Ab
2)Ab screening is positive
3)Patient has a recent episode of adverse transfusion reaction
4)Patient is <4 months old
AXM is performed when patient all 4 EXM criteria does not apply to patient.
For EXM, there are 3 phases. Namely the saline phase, LISS phase and AHG phase.
Saline Phase
1) Add 3d patient serum
2) add 1d 3-5% washed donor cells
3)incubate for 20mins at room temperature
4)Spin down at 1000rpm for 15secs and read
Check for haemolysis and then re-suspend and read under microscope for agglutination.
LISS Phase
1) Add 3d patient serum
2) add 1d 3-5% washed donor cells
3) Add 2d LISS. Mix well
4)incubate for 10mins at 37 degree celcius
5)Spin down at 1000rpm for 15secs and read
Check for haemolysis and then re-suspend and read under microscope for agglutination.
Then we'll proceed to AHG phase
AHG Phase
1) Wash the cells in the LISS tube in 0.9% saline 3 times.
2)Add 2d AHG to the red cell button in test tube
3)Spin down at 1000rpm for 15secs and read
4)re-suspend and read under microscope for agglutination.
If the tube gives negative results, add 1d control cells and then spin again. Should it yield negative results again, test will have to be repeated.
For AXM, these are the steps. It's much easier and takes a shorter time
AXM
1)Label 1 tube for the donor sample to be tested.
2) Wash this donor sample in 0.9% saline.
3)Add 2 drops of patient serum to a clean, labelled tube
4)Add 1 drop of 3-5% washed donor cells to the labelled tube
5)Spin down at 1000rpm for 15secs and read
6)Check for haemolysis and then re-suspend and read under microscope for agglutination.
Purpose of compatibility testing is to select a unit of compatible blood for each potential recipient which will have acceptable survival and will not cause clinically significant destruction of the recipient's own cells. As long as it's possible, units of the same blood group and Rh(D) group will have to be selected for patient.
Since EXM consist of 3 phases, and includes incubation at 37deg, it can better detect IgG antibodies .
yanhong 0703979e
Sunday, November 8, 2009
Tuesday, November 3, 2009
Microplate Technique
Hello everyone. I am sorry for the late post.
In this final post, I am going to share about one technique that I used in my project. I am designing antibody screening panels. This would require a lot of phenotyping of donor cells to create a good quality panel. One of the antigens that must be expressed in an antibody screening panel is the S antigen. This antigen is rare in the local population, with a frequency of 6%. Hence, the objective of this microplate technique is to screen for cells that are negative for the antithetical little s antigen. This means I would select cells that are either homozygous or heterozygous for S antigen to do full phenotyping.
Each week I would receive a batch of samples of about 60 and above. I need to screen all for little s negative antigen. Since the manufacturer insert of my antisera reagent does not recommend to be used for indirect coombs test, I cannot use the Techno TwinStation machine for this phenotyping. Instead, I used the microplate technique at room temperature, which allows screening of huge amount of samples at one go.
Procedures
1. Label all donor samples and position them according to the wells numbering in a rack.
2. Prepare 0.8% red cells suspension of each donor samples. The lower concentration would make it easier to read for agglutination.
3. Add 50ųl of red cells suspension into each well using a disposable pipette.
4. Add 50ųl of diluted antisera (1:1000) using the multi-dispenser pipette. The dilution factor of the antisera is derived from titration prior to the test.
5. Leave the microplate to stand without disturbance at room temperature for 30 to 40 minutes.
6. Record results.
Result Interpretation
If a well were positive for little s antigen, the red cells would form a monolayer suspension with no button formation observed. If a well were negative for little s antigen, the red cells would form a clear and compact button at the center of the well. To ensure valid results, positive and negative controls are used.
Picture retrieved from
http://www.hpa-midas.org.uk/images/page_images/agglutination_assay.gif
Advantages of microplate technique
1. It serves as a good preliminary screening method for phenotyping rare antigens.
2. It can handle large volume of donor samples at one time.
3. Produce rapid and reliable results.
4. Reduce wastage of disposable equipments in comparison to the tube technique.
5. Reduce cost, as the method is reliable for diluted antisera reagent.
Thank you.
Indah.
Sunday, October 25, 2009
Slide Making
Hi everyone, I’m Justin here. Sorry for my super late post. For the last post, I’ll write about slide making.
Slide making involves dropping fixed cell suspension onto slides. Slides are then air dried. The air drying is based on the principle that fixed cells are supported with a thin layer of fixative. When the fixative evaporates, the cell would be pressed down, resulting in the spreading of chromosomes. The rate of fixative evaporation has to be controlled. If evaportation is too fast, a cytoplasmic background will be present and spreading will be poor. If the fixative evaporates too slowly, the weakened cell membrane may lose its integrity, leading to chromosome loss. Thus, the slide making process is able to eventually influence chromosome spreading and morphology.
The main factors that affect the slide making process are temperature, humidity and airflow. Humidity relates to the amount of moisture in the air. If the air is dry, evaporation rate will be faster, while if the air is moist, evaporation rate will be slower. Environment temperature is taken into account together as warm air is able to hold more moisture. The airflow within the area that slides are made affects the speed of drying. These factors directly affect the drying process, thus being the most important factors in a successful slide.
The lab I’m in uses a de-humidifier and the air conditioner for temperature and humidity. Another lab has a slide drying chamber, in which temperature, humidity, as well as air flow can be controlled more easily. It is important to consistently get slides of appropriate quality.
That’s all. Take care. To SIP and MP !
Ng Tze Yang Justin
0703747F
Sunday, October 18, 2009
Mammalian Cell Technology
For my major project, I am required to culture and subculture mammalian cells. The type of cell I am culturing is large lung cancer cells; NCI-H460. This cell line grows best in RPMI medium.
Culturing of NCI-H460 cell line
1. Cryovial containing 1ml of NCI-H460 cells are removed from the liquid nitrogen and thawed in the 37°C water bath.
(Ensure that the cryovial is securely capped to prevent any leakage.)
2. The RPMI medium is warmed at 37°C water bath for approximately 30 minutes.
3. 5ml of the RPMI medium is added into the centrifuge tube.
4. All cells are removed from the cryovial and added into the 5ml RPMI medium.
5. The centrifuge tube is centrifuged at 1000rpm for 5 minutes.
6. The supernatant is removed and discarded into sodium hypochlorite.
7. The cell pellet is suspended in 10ml of RPMI medium.
8. 50µl of the cell suspension is removed and placed into a microcentrifuge tube (for cell counting).
9. The remaining cell suspension is placed into a T-75 flask.
10. 10ml of RPMI medium is added into the T-75 flask.
11. Incubate at 37°C with 5% CO₂.
Cell counting to determine seeding density
1. 50µl of the cell suspension is added into 50µl of trypan blue.
(Trypan blue will stain the dead cells)
2. Mix well by pipetting it up and down slowly.
(Ensure that the tip of the pipette is not placed against the surface to prevent damaging the cells.)
3. 10µl of the mixture is pipetted into the haemocytometer chamber.
4. Viable cells within the four corner squares of the haemocytometer are counted.
5. The cell density is calculated, average number of cells X 2 X 10
6. The total number of viable cells is calculated, cell density X 10ml
7. Clean the haemocytometer with alcohol.
(Ensure that it is not left for too long as the trypan blue will stain the haemocytometer.)
Strict aseptic techniques need to be observed as presence of contamination will prevent the growth of mammalian cells.
Liyana
0703827F
Monday, October 12, 2009
ASOT
ASOT is commonly ordered by doctors whom patient is suspected of having Group A Streptococcus infection. Procedure for ASOT is as followed.
1. A drop of positive control was dispensed onto the 1st test area.
2. A drop of negative control was dispensed onto the 2nd test area.
3. A drop of sample was dispensed onto the 3rd test area using micropipette.
4. A drop of latex reagent was added to the 3 test areas.
5. Sample and reagent were mixed thoroughly using wooden sticks.
6. Test card was placed on electronic rotator for 2 minutes at 100 ± 2 rpm.
7. Test results was observed and recorded.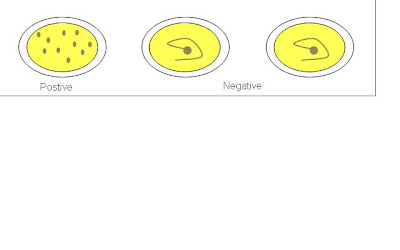
A negative ASOT result does not rule out the possibility of patient having Group A Streptococcus infection. If patient is still suspected of having the infection, a second blood sample should be taken for the test four weeks later from the previous ASOT test day.
Hui Juan
0702012F
Sunday, October 4, 2009
NNJ
In this posting, i'll be talking about NNJ investigation due to ABO incompatibility between the mother and baby.
NNJ - Neonatal Jaundice
Ok. For this investigations, it will be conducted in the blood bank. The nurses will send in a EDTA baby sample and 1 plain tube containing the mother's blood and another EDTA tube containing the mother's blood. So we have 1 tube from the baby, usually the cord blood and another 2 from the mother. These 3 tubes will be sent in a biohazard bag that is attached to the request form.
Mostly NNJ is caused by ABO incompatibility. So the first step is to test for baby and mother's blood group and check if there's incompatibility.
So, if the mother is Group O/A and the baby is group AB/B, there is blood group incompatibility. (Mother has anti-B)
If the mother is Group AB and the baby is group O, there's no blood group incompatibility.
For the baby's sample we only do forward grouping. Reason being: they haven't develop antibody yet.
After we determine that there is ABO incompatibility, we proceed to the "antibody titration stage" We either do the anti-A or anti-B titration with freshly prepared group A or B cells. Like erm, if the mother is Group A, baby group B, she has anti-B, so we do anti-B titration.
It's not possible that both Anti-A and Anti-B titration is required, because if the mother is group O, how can baby be of group AB? Unless the baby is not hers?!
Right. So for the titration we label them from 1:1 dilution to 1:1024 dilution.
1. 3 drops of saline is added into all but 1st tube
2. Into tubes "1:1" and "1:2", we drop 3 drops of mother's serum(plain tube)
3. From tube "1:2" to "1:4" transfer 3 drops over after mixing
4. From tube "1:4" to "1:8" transfer 3 drops over after mixing
5. Keep doing this until the last tube where 3 drops will be pipetted away(from steps 1 to 5, don't wash the pipette. Just keep using the same pipette. This is to avoid further dilution.
6.Then, go over to the fridge, take out a unit of blood of A packed cell(for anti-A titration).
Pull out a segment of blood from the unit.
 See the "tubing-like" rubber structure containing blood, there's a machine which can actually like fuse part of the "tube" together to create a segment, so we can actually pull out a segment without having to puncture and dirty the blood.
7. So to remove impurities, we wash it in 0.9% saline once
8. Then dilute the cells to create a 3-5% cell suspension.
9. Pipette a drop of the cell suspension into all tubes, from 1:1 to 1:1024
10. Incubate all the tubes for 1 hour
11. Centrifuge at low speed, 1000rpm for 15seconds
Read the results. Usually the first 2-3 tubes will be fully haemolysed.
In some tubes, there'll be partial haemolysis, with some agglutinates still present while in some. Record the results. Notify the ward staff/doctor if haemolytic anti-A or anti-B is detected
Thank you!
yanhong 0703979e
NNJ - Neonatal Jaundice
Ok. For this investigations, it will be conducted in the blood bank. The nurses will send in a EDTA baby sample and 1 plain tube containing the mother's blood and another EDTA tube containing the mother's blood. So we have 1 tube from the baby, usually the cord blood and another 2 from the mother. These 3 tubes will be sent in a biohazard bag that is attached to the request form.
Mostly NNJ is caused by ABO incompatibility. So the first step is to test for baby and mother's blood group and check if there's incompatibility.
So, if the mother is Group O/A and the baby is group AB/B, there is blood group incompatibility. (Mother has anti-B)
If the mother is Group AB and the baby is group O, there's no blood group incompatibility.
For the baby's sample we only do forward grouping. Reason being: they haven't develop antibody yet.
After we determine that there is ABO incompatibility, we proceed to the "antibody titration stage" We either do the anti-A or anti-B titration with freshly prepared group A or B cells. Like erm, if the mother is Group A, baby group B, she has anti-B, so we do anti-B titration.
It's not possible that both Anti-A and Anti-B titration is required, because if the mother is group O, how can baby be of group AB? Unless the baby is not hers?!
Right. So for the titration we label them from 1:1 dilution to 1:1024 dilution.
1. 3 drops of saline is added into all but 1st tube
2. Into tubes "1:1" and "1:2", we drop 3 drops of mother's serum(plain tube)
3. From tube "1:2" to "1:4" transfer 3 drops over after mixing
4. From tube "1:4" to "1:8" transfer 3 drops over after mixing
5. Keep doing this until the last tube where 3 drops will be pipetted away(from steps 1 to 5, don't wash the pipette. Just keep using the same pipette. This is to avoid further dilution.
6.Then, go over to the fridge, take out a unit of blood of A packed cell(for anti-A titration).
Pull out a segment of blood from the unit.
See the "tubing-like" rubber structure containing blood, there's a machine which can actually like fuse part of the "tube" together to create a segment, so we can actually pull out a segment without having to puncture and dirty the blood.7. So to remove impurities, we wash it in 0.9% saline once
8. Then dilute the cells to create a 3-5% cell suspension.
9. Pipette a drop of the cell suspension into all tubes, from 1:1 to 1:1024
10. Incubate all the tubes for 1 hour
11. Centrifuge at low speed, 1000rpm for 15seconds
Read the results. Usually the first 2-3 tubes will be fully haemolysed.
In some tubes, there'll be partial haemolysis, with some agglutinates still present while in some. Record the results. Notify the ward staff/doctor if haemolytic anti-A or anti-B is detected
Thank you!
yanhong 0703979e
Saturday, September 26, 2009
DAT and Elution
Hello.
A sample that is sent to the Red Cell Reference Laboratory for red cell alloantibody identification would have a case history, where it would include the results of the tests that have been previously performed by the requesting hospital blood bank laboratory. Such tests include positive antibody screening or positive Direct Antiglobulin Test (DAT), where further investigation is needed.
A positive DAT may indicate that there are antibodies coating the RBCs. This is usually the case in patients suspected to have haemolytic transfusion reactions, haemolytic disease of the newborn or drug-induced haemolytic anaemia. In such cases, the Red Cell Reference Laboratory staff would have to perform a DAT test to double confirm the result and the strength of the graded reaction submitted by the requesting hospital blood bank laboratory. The stronger the DAT, the more likely it is to be clinically significant.
Test: DAT
Specimen: Blood collected in EDTA tube (purple cap). A clotted specimen collected in a plain tube (red cap) can result in a false positive reaction for the presence of complement due to in-vitro activation of the complement cascade.
DAT test is performed using the gel card technology, where 50 μl of the patient’s 0.8% red cell suspension is added to the microtube column in the ID-DiaMed LISS/Coombs gel card and spun at 910 rpm for 10 minutes. This gel card contains polyspecific AHG reagent to detect IgG and also contains anti-C3d to detect complement. If DAT were confirmed positive, next we would have to find out whether is it IgG antibody or complement C3d or both that is coating the RBCs. We would use an ID-DiaMed DC-Screening II gel card to differentiate the reaction and the steps are the same as the one above. This gel card contains monospecific AHG reagents such as anti-IgG and -C3d. If only C3d were present, an eluate is not likely to yield any useful information and should not be performed in most cases. If IgG were present, we would proceed to do an acid elution.
Elution allows the dissociation of the antibodies from the RBCs cell surface to allow for identification. Acid elution is a relatively quick and easy method and is most suitable for the detection of warm reactive antibody. The washed antibody-coated cells are mixed with a glycine acid solution at a pH of 3.0. The antigen-antibody bond is disrupted and the antibody is released into the acidic supernatant. The supernatant is separated and the pH is neutralised to allow for antibody identification.
The acid elution kit used is called DiaCidel Kit that consists of ready-to-use reagents offering an easy working procedure for the elution of most common antibodies.
Reagents
1. DiaCidel wash solution (concentrated) containing Glycine-NaCl buffer. The working solution can be prepared by diluting the concentrated wash solution with distilled water in 1:10 (i.e. 1ml concentrated wash solution and 9 ml distilled water).
2. DiaCidel elution solution containing a low pH glycine buffer solution with a colour indicator.
3. DiaCidel buffer solution containing Tris buffer with bovine albumin (1.2%).
Test Procedure
1. Wash the red cells which are DAT positive once with isotonic 0.9% saline solution. At least 1ml of packed cells are required.
2. Wash 1.0 of packed cells 4 times with DiaCidel working wash solution.
3. Decant completely after the last wash and keep part of supernatant to test for the presence of irregular antibodies.
4. Add to the 1ml of wash packed cells with 1.0 ml of DiaCidel elution solution. Mix well.
5. Centrifuge immediately for 1 minute at 3000 rpm.
6. Transfer the eluate into a clean tube.
7. Add 5 drops (250 μl) of DiaCidel Buffer Solution to the eluate and mix well. Observe the forming of a blue colour that indicates a neutral pH of 6.5-7.5 us reached. If the blue colour is not obtained, add more buffer 1 drop at a time while mixing.
8. Centrifuge the eluate for 1 minute at 3000 rpm to completely remove any residual cells.
9. Eluate is now ready for testing.
Perform the normal procedure used for antibody identification with the eluate. Use the supernatant solution kept form the last wash in parallel as a negative control.
When you perform the antibody identification with the eluate, you would run an 11-cell panel without including the own patient’s red cells. Confirm the presence of an antibody if the pattern of reactivity matches a pattern of antigen-positive cells. If your DAT is positive but after doing elution and running on the 11-cell panel, the result is negative for all common antibody, we would not proceed on with the investigation. This could be due to many underlying reasons such as hypergammaglobulinemia or drug reactions.
Some links to check out the gel cards and the elution kit that I was referring to:
http://www.diamed.com/product_detail.aspx?id=123&navvis=
http://www.diamed.com/product_detail.aspx?id=122&navvis=
http://www.diamed.com/product_detail.aspx?id=494&navvis=
Thank you.
Indah.
Saturday, September 19, 2009
Bone marrow culture set-up
Hi everyone, I’m Justin here again. Today I’m going to talk about bone marrow culture set-up. This step involves the initiation of cultures by inoculating cells into the media. The specimen is bone marrow aspirate in sodium heparin anti-coagulant (the green top). Other types of anti-coagulants should not be used as they will affect cell viability. The purpose is to get viable cells that are dividing.
The specimen is centrifuged at 1500rpm for 10 minutes and the buffy layer is obtained. The buffy layer is the layer in between the red cells and the plasma portion. The amount of buffy layer to inoculate depends on its thickness and the WBC count. It is very important to inoculate the correct amount of cells. Adding too much cells will cause nutrients to be depleted fast, resulting in cell death too early or stopping of mitotic activity. Adding too little cells will result in not enough metaphases for analysis. As a guide from the technical procedures manual, if the layer is more than 1 mm thick, use ½-1 drop. If it is about 1 mm thick, use 2 to 3 drops.
The duration of culture depends on the suspected diagnosis. The purpose of using 2 durations is because certain abnormal clones can be found immediately while others need more time to grow. For most cases, setting a 24 and 48 hour culture will be appropriate to yield the abnormality present. Only abnormal clones show the specific cytogenetic abnormality.
For conditions such as AML (acute myeloid leukemia); CML (chronic myeloid leukemia); (MPD) myeloproliferative diseases eg, polycythemia vera, a 24 and 48 hour culture will be set up.
For cases of chronic lymphocytic leukemia (CLL), mitogens are added to stimulate specific clones as clones are dividing very slowly. TPA (Tetradecanoylphorbol acetate) and PHA (phytohemagglutinin) are growth factors specific for B-cells and T-cells respectively. For new cases of CLL the 2 cultures are 72 hours with TPA and PHA so as to determine the specific cause, whether the CLL is due to B-cells or T-cells. For follow up cases, a 48 hour culture is set up and another culture is the 72 hour with the specific mitogen.
For cases of Multiple myeloma (MM), a direct harvest is done and a 72 hour culture with Il-6 is set. The direct harvest is done so as to get abnormal clones characteristic of MM present that are aggressively dividing. They will die off fast, thus the need for the direct harvest. The 72 hour culture is set up and because other clones divide very slowly. Il 6 is a cytokine which would help abnormal clones proliferate.
The culture media used is the RPMI 1640 complete culture media. The media is supplemented with L-glutamine, antibiotics, and fetal bovine serum. L-glutamine is an essential amino acid. Fetal bovine serum provides proteins and growth factors. Antibiotics such as penicillin and streptomycin inhibit the growth of bacteria in the culture.
Cultures are incubated for their respective durations in a 37ºC incubator in 5% CO2. The CO2 allows the pH of cultures to be in equilibrium. The temperature of incubation at 37 ºC is the physiological body temperature which is optimal for growth of human tissues.
That’s all for now. Take care everyone ! All the best for MP and the remaining SIP !
Ng Tze Yang Justin
0703747F
Friday, September 11, 2009
Clinical Chemistry
Cobas is an analyzer used in biochemistry. Some of the common tests include Troponin-T, CKMB, HbA1c, and total PSA etc. The tests may use one of the two principles, competition or sandwich.
An example of a test that uses the competition principle is cortisol. Firstly, the sample will be incubated with a cortisol specific biotinylated antibody and a ruthenium complex labelled cortisol derivative. Depending on the concentration of cortisol in the sample and formation of respective immune complex, the biotinylated antibody binding site will be occupied partly by cortisol from the sample and the ruthenium complex labelled cortisol derivative.
Next, streptavidin coated microparticles are added. The mixture undergoes a second incubation whereby the immune complexes bind to the solid phase through interaction between the biotin and streptavidin.
Subsequently, the mixture will be added into the measuring cell. The microparticles will be magnetically attracted onto the surface of the electrode. Unbound substances are removed with Procell. Voltage will be applied onto the electrode and induce chemiluminescent emission that will be measured by a photomultiplier.
An example of test that uses sandwich principle is CKMB. The difference would be the use of two antibodies; CKMB specific antibody labelled with ruthenium complex and biotinylated anti-CKMB antibody. Therefore, during the first incubation, it would form a sandwich complex whereby the CKMB present in the sample will occupy the binding site of the CKMB specific antibody and the biotinylated anti-CKMB antibody will bind to the CKMB specific antibody. The subsequent process that takes place is similar to that mentioned above.
The clinical significance of cortisol is for diagnosis of Cushing's syndrome (overproduction of cortisol) and Addison's disease (underproduction of cortisol). The reference range of cortisol is 5-25ug/dL at 8am and 2-17 ug/dL at 4pm. This is due to significant diurnal variation in cortisol levels, whereby it is highest in the morning and lowest at night.
The clinical significance of CKMB is for diagnosis of myocardial ischaemia, e.g. in acute myocardial infarction and myocarditis. However, CKMB may also be present in stroke and rhabdomyolysis. Therefore, total CK and Troponin-T levels should also be tested to differentiate between the two clinical implications. In addition, CKMB will be present 3-8 hours after onset of cardiac symptoms. Therefore, sensitivity of CKMB test is dependent on the time the sample was collected. The reference range of CKMB is 0-5ng/mL.
Liyana
0703827F
Tuesday, September 8, 2009
Procedures involving documentation in Admin
Hello everyone, sorry for the late posting. Once again, I'm back to the administrative department. Since the ISO audition just passed yesterday, I'll talk more about the procedures involved in the department that requires documentation.
Firstly, as the administrative department (admin) is the first to come in contact with the different specimens dispatched to us, we will reject any urine or stool specimens that have leakage. If a unsuitable specimen was sent for a test, we will either call the clinic and request for a new specimen and put the one that we have on hold or reject the specimen. This will be dependent on where the specimen is received from, whether it is from the hospital ward or external clinic. Sometimes, after the plain tube is spun, the technicians will reject the blood due to haemolysed specimen. If EDTA or Sodium Citrate tube is clotted, the technicians will also reject the specimen. All the rejected specimens requires a rejection form, which will either be passed to the admin staffs by the technicians or be written by the admin staffs. After a rejection form is written, the admin staff is to call the respective clinic to inform them of the rejection and note down the name of the person that we spoke to. This will than be commented in the system and the respective test affected will be deleted from the patients' record unless the patient is requesting for a package (a series of tests billed under the same code). For eg, "EDTA clotted (Bld Grp) - infrm __". The rejection form will be faxed over to the respective clinic and be photocopied. The original rejection form will be dispatch to the clinic on the following day while the photocopied copy will be filed in the file label 'Rejection of Specimen'. Then, we will find the request form for that patient and comment on the form as what we have commented in the system.
If an extra specimen is received or as mention previously, a wrong specimen is sent by the specimen is put on hold while waiting for the new specimen to arrive, we are to record the patient's particular, lab request number and type of specimen in the EXTRA BOOK. A comment both in the system and on the request form will look like this, "extra plain", and we are to state that the specimen is an extra by writing the word 'extra' on the specimen label that we printed.
If a further confirmation is required for a particular patient's test result, the technician will inform the admin staffs who will then call and inform the clinic. While informing the clinic, we are also supposed to inform them of the delayed test report the turnaround time for the send-out tests differ. The name of the person that we spoke to will be noted and a comment will be noted in the system like this, "HIV added - inf__" when the HIV antigen and antibody level is tested reactive in our laboratory.
Often, we received specimens that are wrongly labelled (with a different patient's name or a spelling error in the patient's name). We are required to call the clinic and request for a staff to come to our laboratory to label the specimen with the correct label and also give us a memo that tells us that the specimen belongs to the particular patient. The patient's particulars will then be recorded in a blue coloured file with the name of the person we spoke to from the clinic and clinic that the patient belongs to.
Any memo that is faxed over or passed to us will be photocopied. The memo must contain the signature of the person who wrote the memo and any amendment required must be stated clearly. The original copy will be filed in the monthly memo file while the copied one will be stapled to the request form. If a name or ID amendment is made, the technician must be informed to re-approve the result so that the clinic is able to view the result via the system.
Finally, regarding the pictures of the VDRL, I am still trying to get the permission from my lab manager to post them (We are very busy during work, so there is no chance for me to ask...). Hope my explanation is clear enough to let you guys have an idea of how the admin department work! XD
Hui Juan
0702012F
Saturday, August 29, 2009
Cold Antibody Testing
As the name suggest, this test is used to detect cold antibody. Not only do we detect whether there is cold antibody, we also detect the cold antibody titre.
Firstly, we serial dilute the antibody of the patient. Then we test the different concentrations of antibody against 3-5% patient cells and control cells. The titre value is determined by the highest dilution that can still cause a positive reaction. Titration value can help quantify the relative antibody concentration in the plasma.
The most common type of cold auto-antibody is IgM. This antibody is capable to cause cold haemagglutin disease (CHD). The most common specific cold antibody seen is auto anti-I.
CHD can be acute or chronic. Acute condition is usually caused by mycoplasma pneumoniae infection. For chronic condition, it usually occurs in elderly suffering from chronic hemolytic anaemia.
As a control, a segment group O cells will be taken from a random blood unit that has no blood antigen listed on the unit of blood. (The pints of blood have a sticky label on top of it. Should there be any antigen, it'll be listed on the pint of blood) For example, some units are (K-). Since the units are selected at random, we must also note that should this test be repeated with a segment from another group O cells, we expect similar results, but never the same results.
Procedure:
1. Label 2 sets of tubes, first set with "own cells followed by the dilution", e.g. OC 1, second set with "control cells followed by the dilution, e.g. CC 1024.
2. We pipette 6 drops of saline into tubes from: OC 2 to OC 1024.
3. Then, 3 drops of patient's serum into OC 1 and CC 1, 6 drops into OC 2.
4. From OC 2, we mix the saline and serum well, then pipette 6 drops into OC 4, and 3 drops into CC 2. This ensures that the OC and CC concentration are the same.
5.From OC 4, we pipette 6 drops into OC 8 and 3 drops into CC 4.
6.From OC 8, we pipette 6 drops into OC 16 and 3 drops into CC 8.
7. This process is repeated until we reach OC 1024. 3 drops are pipetted into CC 1024 and 6 drops are pipetted out into the waste container.
8. We should obtain 3 drops in every tube, and we must be careful as to not introduce any air bubbles in the process of pipetting as it may influence the readings.
9. Add 1 drop of 3-5% patient's own washed cells to each of the OC tubes
10. Add 1 drop of 3-5% control own cells into each of the CC tubes
11. Incubate the tubes at 4 degrees for at least 2 hours.
12. Read the tubes and rate them from 4+ to +w(where the w is in superscript), +w represents plus weak, i.e a very very weak agglutination reaction where you see numerous agglutinates in a background of free cells.
13. To check for microscopic agglutination reaction, cold glass slides are are in the refrigerator is used.
Agglutination reaction at 1:32 dilution or lower is regarded as clinically insignificant while agglutination reaction at 1:64 or higher is regarded as clinically significant.
Results are expressed as the reciprocal of the highest serum dilution able to cause a macroscopic reaction with group O cells. Reactions in both sets of tubes should appear very similar unless there is a mistake somewhere. It is also important that we read the results inside the fridge, that way, the positive results will not become negative reactions
Yanhong
0703979E
Saturday, August 22, 2009
Tissue Typing (HLA) Laboratory
I was attached to the tissue typing (HLA) laboratory for a week and had fun learning new things. It was a bit stressful at times, as the procedures performed in this laboratory requires critical attention with much understanding of the HLA system.
Human leukocyte antigen (HLA) is a specialised category of immunology that deals with human histocompatibility testing. This laboratory discipline supports clinical specialities in transplantation, transfusion and immunogenetics. Hence, a laboratory officer must be specialised in this field to handle the heavy responsibilities. All of the preliminary result is double-checked by senior laboratory officers for confirmation. The HLA laboratory in BSG handles samples that are mainly for organ and bone marrow transplantation. We also receive samples from regional countries such as Vietnam and Malaysia.
It is necessary to determine the HLA antigen composition in an organ or bone marrow recipient to match with the prospective donor, who may be living family-related or unrelated deceased. For transfusion cases, patients that underwent platelet therapy may develop platelet refactoriness that can result in poor platelet survival following random donor platelet infusion. Hence, it is important to identify HLA alloantibodies in the recipient serum before transplantation or transfusion. HLA alloantibodies are majority IgG.
The testing services offered by HLA laboratory in BSG are HLA antigen typing, HLA antibody identification (i.e. determining the specificity of the anti-HLA class I and II antibodies) and lymphocyte crossmatching between donor cells and recipient serum for compatibility. I got the opportunity to view and do both serological and molecular techniques in a HLA typing test. Since it is very lengthy to explain both, I will focus on explaining the serology part.
For serological procedures, the very commonly requested test is the HLA-B27 typing. This tissue antigen is associated with ankylosing spondylitis. Samples are received in acid-citrate-dextrose (ACD) tube or heparin tube (green cap). We will do layering of the blood sample with Ficoll-Paque in the ratio 3:1 and centrifuged the tube at 2000 rpm for 20 minutes. This condition is ideal to create a density gradient so that we can separate out the lymphocytes. 4 layers are obtained: bottom – red cells, Ficoll-Paque, lympocytes and monocytes, and plasma – top. Discard the plasma and carefully transfer the lymphocytes and monocytes layer into a clean tube without taking so much Ficoll-Paque using Pasteur pipette. Wash 3X this layer with cold PBS for purification.
Next, we want to harvest T cells. Why T cells? This is because HLA-B27 is categorised as HLA Class I molecule and we don’t want B cells that have both Class I and II molecules. We will use the magnetic particle concentrator (MPC), where we add the Class I beads (they are actually monoclonal antibodies specific against Class I antigens). This will positively select the T cells. We will dilute the cells to the optimal concentration with prepared solution that contains Hank’s balance salt solution (HBSS), 2% fetal calf serum (FCS) and acridine orange (AO).
Next, we will perform the complement-dependent cytotoxicity (CDC) assay. Before doing so, we will check if we got the optimum cell concentration and cell viability (graded with score of 1 i.e. 0-10% dead cell) by adding 2μl of cells to an empty well of a microtiter plate and 2μl of Propodium Iodine (PI). This will stain the cells under the fluorescent microscope. Green means cells are alive while red means cells are dead.
We use a 60-well commercial microtiter plate. The plate has 1μl of known antisera with mineral oil layer on top to protect the antisera from evaporation. We will add 2μl of the patient T cells and incubate at room temperature for 40-50 minutes. Then we add 5-6μl of rabbit complement to each well and incubate for 60 minutes in the dark (we just put the plate in a metal plate with a lid). After that we add 2μl of PI in 5% EDTA solution to each well for 15 minutes at room temperature. This is for staining and to also stop the cytotoxic reaction. Lastly, we will remove excess fluid and add paraffin oil to prevent evaporation when viewing under the fluorescent microscope (10X objective). If the 81-100% of the cells are dead (i.e. graded with a score of 8), the cells are strongly positive for the HLA-B27 antigen.
Indah.
0705361D
Friday, August 14, 2009
Bone Marrow Harvest
Hello everyone ! I’m Justin here again. Sorry for my super late posting. Hope all of you are enjoying your SIP so far =) Today I’ll talk about the harvesting process in more detail, covering the protocol, as well as some stuff to note.
As mentioned before in my previous post, harvesting is the processing step to obtain metaphases for analysis. The 3steps involved are mitotic arrest, hypotonic treatment, and fixation.
The cell cycle is arrested at metaphase by colcemid, which depolymerises tubulin, thus preventing spindle fiber formation. Although an increase in duration of exposure to colcemid causes more metaphases to be collected, a prolonged exposure to colcemid also causes chromosome contraction as an effect. This would result in shortened chromosomes, which are not suitable for analysis. Hence, the duration of colcemid exposure should be limited.
Hypotonic treatment causes water to enter the cell. 0.075M of potassium chloride is used. Cells would swell and increase in volume, thus causing chromosomes to spread out. The incubation at 37ºC will speed up the process. The duration of hypotonic treatment has to be controlled, as over-treatment will cause excess spreading of chromosomes and cell lysis.
The final step is fixation, using modified Carnoy’s fixative, which consists of methanol to acetic acid in the ratio of 3:1. The fixative has to be prepared fresh and refrigerated. This is because over time the fixative would absorb water from the surroundings, thus causing the fixative to lose its properties. Fixation hardens cells and makes them resistant to changes. Changing of the fixative (through centrifugation and removing the supernatant) also lyses red blood cells, providing a clear suspension.
In this protocol, the colcemid solution and potassium chloride are incorporated into 1 solution, known as the harvest media. 0.08µg/ml of colcemid is used. Cells are exposed to the harvest media for a duration of 30 minutes.
Method:
1.Obtain the cultures from the incubator (after their respective durations of incubation- recall first post on culture setup) and transfer the culture contents into a centrifuge tube. (This is done because the culture flasks cannot fit into the centrifuge) Centrifuge at 1500rpm for 10 minutes.
2.Remove the supernatant and add 10 ml of harvest medium to the cell pellet. (The harvest medium contains the colcemid and the hypotonic solution)
3.Incubate in a 37ºC incubator for 30 minutes.
4.After which, remove from the incubator and perform a pre-fix step by adding 2ml of fresh cold fixative. (The purpose of the pre-fix step is because cells are fragile after the 30 minutes exposure to the hypotonic solution. The fixative will harden the cells and prevent them from being destroyed by the force of centrifugation) Ensure that cell clumps are well dislodged by mixing well.
5.Centrifuge at 1200 rpm for 10 minutes.
6.Remove the supernatant and resuspend the cell pellet in 6 ml of cold fixative. (This is the fixation step) Ensure that cell clumps are well dislodged by mixing well.
7.Centrifuge at 1200 rpm for 10 minutes.
8.Remove the supernatant and resuspend the pellet in 4ml of cold fixative. (this is to change the fixative) If supernatant is still coloured, change the fixative (through centrifugation, removing the supernatant and re-suspending the pellet in 4ml of cold fixative) until it becomes clear.
9.Place the tubes in the refrigerator. (the next process would be slide making)
Per culture- 10 ml of harvest media
12 ml of fixative (2ml pre-fixation+6ml fixation+ 4ml changing of fixative)
That’s all for now. Take care everyone and enjoy SIP !
Ng Tze Yang Justin
0703747F
Sunday, August 9, 2009
Immunology
Architect is the analyzer that is used to detect the presence of antigens, Abs and analytes in the sample. The principle that it uses is the chemiluminescent microparticle immunoassay (CMIA) technology.
When the sample is loaded into the analyzer, the barcode on the plain tube will be scanned for the analyzer to conduct the respective test that was requested.
When the sample is processed, microparticles (paramagnetic microparticles coated with capture molecules) will be dispensed into the reaction vessel (RV) containing the sample (i.e.: serum). It will then be vortexed and incubated to allow the reagents and the sample to interact. If the analyte is present in the sample, it will bind to the corresponding capture molecule on the microparticles forming immune complexes. After incubation and vortexing, a magnet will attract the bound paramagnetic microparticles to one side of the surface of the RV. It will then undergo a first wash to remove unbound materials.
Next, a chemiluminescent acridinium labelled conjugate will be added into the RV. Similarly, the mixture will be vortexed and incubated. This conjugate will bind to the immune complexes. It will then undergo a second wash to remove unbound materials.
A pre-trigger solution (hydrogen peroxide) is added. It is used to acidify the environment to prevent early release of energy (i.e.: light emission) by the acridinium, it also prevents clumping of the microparticles and it will split the acridinium dye from the conjugate that is bound to the microparticle complex.
A trigger solution is added. It will cause the acridinium to be oxidized due to the presence of peroxide and alkaline solution. Oxidation of acridinium will produce N-methylacridone and release of energy (i.e.: light emission). The CMIA optical system will then measure the chemiluminescent emission to quantitate the concentration of the analyte present in the sample.
An example of a test conducted using the above principle is the Syphillis TP (Treponema pallidum). Syphillis is caused by an infection by the TP bacteria. It can be transmitted congenitally or through sexual contact. The analyzer will determine the amount (if any) of anti-TP in the patient’s serum. This will determine the diagnosis of syphilis.
Once the sample is loaded onto the analyzer, the patient’s serum, microparticles coated with recombinant TP Ag and assay diluents are aspirated and dispensed into the RV. Anti-TP present in the patient’s sample will bind to the TP Ag coated microparticle. After vortexing, incubating and washing the mixture, acridinium-labelled anti-human IgG and IgM conjugate is added. After a second vortexing, incubating and washing the mixture, the pre-trigger and trigger solutions are added to the RV. The resulting chemiluminescent reaction is measured using relative light units (RLUs). The higher the RLUs, the higher the amount of anti-TP measured.
Liyana
(0703827F)
Sunday, August 2, 2009
Sorry for the late posting... Starting end of July to end of August, I will be attach to the microbiology department of the laboratory. In the microbiology lab, the specimens that we handled are usually stools, blood tubes and blood culture bottles. Reading the agar plates, antimicrobial sensitivity testing and identification of the pathogenic organisms are done by my supervisor, as he is much more experience and is able to determine which of the colonies on the agar plates are pathogenic almost immediately.
So for me, I'm doing the serology testing in the micro laboratory such as Venereal Disease Research Laboratory (VDRL) test and Treponema Pallidum Haemagglutination (TPHA) test which are syphilis tests that test for the presence of the antibody that is produced in the presence of Treponema Pallidum. Although both of the tests are syphilis test, VDRL is non-specific as the antibody produced with Treponema Pallidum infection that it tests for can also be found when the patient is not suffering for syphilis but other diseases such as hepatitis A and malaria. TPHA is used as a confirmation tests (unless the doctor ordered the test) for syphilis. TPHA uses cells sensitized with Treponema Pallidum specific antigen, hence any agglutination observed would mean a positive that patient is tested positive for syphilis.
Steps involved for VDRL:
1. A drop of serum is taken and spread evenly on the test card.
2. A drop of reagin is added to the serum. (Remove the first few drops to remove the bubbles trapped to prevent uneven volume of reagin added)
3. Test card is placed on an electronic rotator for 8 minutes with approximately two rotations per minute.
4. Test result is observed and recorded.
If agglutination or reaction is observed, proceed to serial dilution to determine the titre:
1. 50µl of saline is placed on 4 different test areas on the test card.
2. 50µl of serum is added to the first test area labelled 1:2. Mix well by pipetting up and down.
3. 50µl of serum+saline mixture is transfered from the first test area to the next labelled 1:4. Mix well by pipetting up and down. Continue till the fourth well and discard the remaining 50µl of mixture.
4. A drop of reagin is added to the different test areas.
5. Test card is placed on an electronic rotator for 8 minutes with approximately two rotations per minute.
6. Test result is observed and recorded.
The titre is taken as the lowest dilution with reaction (agglutination). Once the titre is obtained. TPHA will be performed to confirm the result if the patient is doing a package (a series of test). If the patient is not doing a package, the confirmation will only be done if the doctor order for the test.
Since VDRL is testing for the non-specific antibody for Treponema Pallidum, it is not specific and cannot be used clinically to determine whether patient is suffering form syphilis without a confirmation test.
Hui Juan
TG01
0702012F
Friday, July 24, 2009
ABORh and screening
Hello. For patients that may require a transfusion or require a pre-admission testing, ABORh grouping and antibody screening is done.
For ABORh grouping:
This step if done manually, comprises of the following reagents : anti-A, anti-B, anti-A,B, anti-D, A cells, B cells and O cells. These reagents are already added into the glass tubes by the staff before. This is because we receive a lot of orders everyday we cant simply wait for the specimens to arrive before dripping the reagents. After receiving the EDTA specimen, we'll centrifuge them.
Since the plasma layer is on top, we'll drip 2 drops of serum into each of the reverse grouping tubes, i.e. the A, B and O cells tube. The purpose of this step is to not disrupt the red cells below. Then, we'll pick up some red cell, dilute it in saline and add 1 drop of the 3-5% RBC suspension into each of the 4 forward grouping tubes, i.e. anti-A........ After this step is done, we'll give the 7 tubes a good shake and mix and then centrifuge them at 3,000rpm for 15seconds. Then, we gently agitate the cell button and record the results.
Procedures:
1) Spin specimen in a table top centrifuge at 3,500rpm for 7minutes.
2)Clearly label 7 glass tubes for forward (anti-A, anti-B, anti-A,B) and reverse grouping(A, B, O cells)
3)Into each corresponding tube, add 1 drop of the correct reagent.
4)Using a clean pipette, add 2 drops of test serum into each of the 3 reverse grouping tube.
5)Using the same pipette, prepare a 3-5% red cell suspension of the test cells in 0.9% saline.
6)Add 1 drop of the 3-5% suspension of cells into each of the 3 tubes containing anti-sera.
7)Give them a good mix.
8)Immediately spin them at 3000rpm for 15seconds.
9)Gently agitate and record results
If you don't mix the reagent and test cells/serum before centrifugation, you may not be able to get the correct results. So, it's very important we give the tubes a good mix before centrifugation, especially the reverse grouping tubes.
The next step we do will be antibody screening. There are 2 ways to screen for antibodies, the first will be using the tube method and the second will be using the microtyping Gel cards . I found that the Microtyping Gel cards give a more accurate results. There was this once, i took a specimen which had a 2+ reading using the machine. Then i tried to do manual screening, i ended up getting a negative result. Then i approached one of the staff(tp graduate). She repeated the manual testing with me, results obtained was still negative. Then she did the gel card method again. Tadum! 2+. Moral of the story: Gel Card > Tube. Anyway, the tube method is no longer in use, at least over here.
For gel card method, here is the procedures we take:
1)Identify the appropriate microtubes of the ID-Card"LISS/Coombs"
2)Remove the aluminium foil from as many microtubes as needed. 3)Pipette 50µl of SPO cells I, II and III into the appropriate microtubes marked with the corresponding test cells.
4) Add 25µl of the patient's plasma to each microtubes. 5)Incubate the ID-Card for 15minutes at 37 degrees in the ID incubator. 6)Centrifuge the ID card for 10 minutes in the ID centrifuge 7)Grade and record the results in the appropriate worksheet
The SPO cells are panel cells that contains some antigens, each of the 3 panel cell suspension contains different combinations of a some antigens. These antigens are blood group antigens like C, C, S, Mia etc...
So after test serum is added in, the cards are incubated at 37 deg for 15minutes. This allows agglutination to occur. If agglutination occurs, the agglutinated cells cannot pass through the gel while the nonagglutinated cells can pass through the gel.
A strong positive is seen as a line on the surface while weaker positives are distributed through the gel. To have an idea of how it looks like, click on the 2 links below.
This link shows the card that we use here. See the green part of the label, there are 3 lines, normally we'll write in I, II and III. As for the white portion, we'll write in the patient's ID. A patient only requires 3 microtubes, so 1 Gel card can be used for 2 patients.
This link shows 6 microtubes, the reactions are 4+. 3+, 2+, 1+, neg and neg respectively.
Here are the reasons why Microtyping Card Gel does better than the tube method. For the ID-Card gel system, labour intensive washing procedures are eliminated, this is because the panel cells are added to the microtubes before the plasma and serum is, thus, creates a barrier over the gel suspension. This step can prevent neutralization of AHG (present in card gel) by Serum IgG protein.
This antibody screening result is valid up to 14 days unless the patient has been recently transfused or is pregnant within the past 3 months. For a patient who is has received a transusion or is pregnant within the last 3 months, antibody detection must be performed on a specimen obtained within 3 days of the next scheduled transfusion. This is because these patient may have been sensitized and they may be producing new antibody that was not previously identified.
If the samples tested positive for antibody screening (a positive in any of the 3 microtubes) but has no known antibody on record, we'll repeat the screening and then sent the specimen down to Blood Services Group (BSG), aka CTM for antibody identification.
Yanhong / TG01 / 0703979E
Wednesday, July 22, 2009
Freezing of Red Blood Cells Admendments and Questions
Hey guys, thanks for the questions.
I have some amendments to my first post. First of all, not all the blood that is going to be frozen has to be quarantined. The blood that I was dealing with was malaria blood. Hence that is why they froze it. The donor may come from malaria countries and that may want to do a retest in the future. Hence they decided to freeze it while pending tests in the future. Normal red blood cell that you are going to freeze does not have to be quarantine. The computer system will record the freezing process once you do transformation. Secondly, the blood group has actually been written on the bag. What is missing is the blood group in the recipient card. So you have to actually record the blood group on the recipient card, as the card will be kept somewhere else. Thirdly, I was confused about the plasma extractor. I thought that it was a specific term that was used only when you want to extract plasma. After I was posted to the freezing lab, I was next posted to the centrifuge bay lab. In the centrifuge bay lab, the plasma will be removed from the whole blood and additive solution called SAGM (saline-adenine-glucose-mannitol) has been added to the packed cells. So when you are doing freezing, what am I actually squeezing out is the SAGM and the buffy coat. Fourthly, I would like to emphasize that the HCT has to be between 70 to 80 percent to pass. And lastly, during the addition of glycerolyte solution, the first pause is when you added 50ml for 5 mins and second pause is for another 50ml for 2 mins. When you done the second spin, you have to squeeze out 320 ml of glycerolyte solution out of the primary bag into the transfer bag. Lastly, after the addition of glycerolyte, the freezer bag is left standing for about 15 mins. This is to allow more time for the glycerol to replace the water inside the cells. I am truly sorry for the mistakes that I did in my earlier post. I doubled check what I did with my trainer and he pointed out some of my mistakes and misconceptions.
And now for the questions…
Hi Indah,
After adding the 100ml of the glycerolyte solution, why must the flow be stop? is it not possible to add the total volume at one go? also, what is the purpose of the shaker? Thanks!
zi shuang
0703383J
Thanks Zi Shuang for the question. The shaker is to mix the red cells with the glycerolyte solution as the solution flows into the freezer bag. The faster the speed of the shaker, the faster the flow of the solution out of the Glycerolyte 57 Solution bottle and into the freezer bag. It should be added in a stepwise fashion. So not too fast shaking. The pauses are to allow time for gradual equilibration between the red cells and the glycerol. Hence time is given for the glycerol to enter the cells and replace the water that is present in the red cells.
Hi Indah,
What is the purpose of the Glycerolyte 57 solution?
Qingling
0703433C
Thanks Qing Ling for the question. This solution is basically glycerol. It is a cryoprotective agent. During freezing, the water present in the cells can become ice crystals and cause injury to the cell membrane. This can lead to cell lysis. The glycerol is able to protect the cell from freezing injury and hence enhance cell recovery during thawing.
Hi Indah,
May I know what will happen to the blood that does not complete the freezing process within 4 hours?
Liyana
0703827F
Thanks Liyana for the question. The 4-hour rule is incorporated based on the requirement of the American Association of Blood Banks (AABB). Packed cells and whole blood should not be left out in the room temperature for very long as it must be maintained at temperature of 2-6°C. I am not too sure what are the procedures if you cannot complete the freezing process within 4 hours. One lab technician can only handle 6 blood bags at a time. There is only one centrifuge in which 6 blood bags can fit. Haha. So should be okay.
Hey Indah!
very detailed explanation. although i tink if you have some photos would be better? but i can imagine the primary and the freezer bag together and all that. haha.
ok. question:
1) after transferring the blood to the freezer bag, how come there's a need to also centrifuge the primary bag as well since it has to be discarded eventually?
2)i was just wondering, since the blood are all frozen, when the blood is needed, what is done to de-froze (like the procedures) especially in the case of emergency?
thank you indah!
Janice Yeh :) Grp 6
0701885F
Thanks Janice for the questions. For the 1st question, you are referring to the 2nd spin. The primary bag is not discarded as afterwards you have to transfer 320ml of the glycerol (top layer) out of the freezer bag. For the 2nd question, the process is thawing and deglycerolisation. I did not get a chance to view this as I was practicing on the freezing part. I have only 2 days in this lab before being rotated. so ya. Perhaps, if I have sometime during my major project, I can request to view the process and put it as one of my post.
Indah!
Come up and join me for lunch someday okay.
For the blood, we're only getting the packed cells frozen right?
And erm. This process is quite lengthy and wouldn't be cheap i guess. So, what are the blood types that you guys will freeze? Is it by patient's request? Or just some rare blood group?
Poh Yan Hong
0703979E / TG01
Hey babe… thanks for the question. I don’t have the time to eat with you guys cos the eating place is far away. I made my mom to cook food for me early in the morning. Haha. And I eat with the rest of the staff there at the pantry. But if I managed to get out early for lunch then I will msg you.
Ok, back to the question. Lengthy, yes. Cheap, I don’t know. I guess you just need to buy boxes of glycerolyte solution bottles and transfer bags. About the types of blood that we froze, im not too sure if there are any preference. I guess if we are to stockpile blood, then blood group O is very popular as it is the second choice for transfusion of packed cells as it is universal donor and can be used as emergency blood. I think we also freeze rare blood groups such as Bombay blood.
Hi Indah, :)
I'm just curious why do we need to place the bag into the water bath for 30 mins and at 37 degree C? What is the bag and its purpose?
Rachel Gan :)
Thanks Rachel for the question. The bag is the primary bag. If you are referring to the type of bag, I think it is the Baxter bag, 450ml. There are other types of bag as well such as Terumo bag. The purpose of placing the bag in the water bath before adding the glycerol is to let the cells warm up and the membrane more fluid so that later it is easier for the glycerol to enter the cells and the water to go out of the cells. The timing is important. We have a stopwatch alarm to time for exactly 30 mins.
Hello Indah,
Hope you are well =)
Are you meaning to say that the process involves removing the plasma and the buffy coat ? Also, why must some plasma be added back into the primary bag until the weight is increased by 25g ?
Thanks,
Ng Tze Yang Justin
0703747F
Hey Justin. I’m very well. I apologise for the plasma part. It is actually SAGM – an additive solution you added to the packed cells as explained in my amendments. Why you add back 25 g? I was told that it is method for the HCT testing. A failed HCT is retested again. A repeated HCT failure means you have to do the entire process again. The HCT may be too low indicating your cell recovery during thawing will likely to be low. I’m guessing that too high HCT could be due to centrifuging effects where the cells are really packed together. To get an accurate HCT as possible, it is best to add back 25g.
Saturday, July 18, 2009
Freezing of Red Blood Cells
Hi. I’m Indah and I’m attached to a blood bank laboratory section.
There are many different laboratories and I was rotated from one laboratory to another. One of the laboratory sections that I was posted to is the freezing of blood. Blood can be frozen and stored for up to 10 years. This can be applied in situations like rare blood groups or autologous blood for future surgery. I am going to bring you through the process that I have done.
Blood that is going to be frozen has to be quarantined in the blood bank computer system and it will not be allowed for issue to the hospitals for transfusion. For every blood and its derived blood components that are quarantined, a unique quarantine number will be issued and is recorded in the quarantine logbook. The blood will be stored in the pending cold room. On the day that the blood will be frozen, it will be transfer to a refrigerator in the freezing laboratory, where it will be stored temporarily at 2 to 8°C. Blood that will have to be frozen are usually closed to its expiry date and freezing has to be done before expiration. I did freezing on red blood cells. The entire freezing process will have to done within 4 hours.
First of all, write down the blood group on the bag that will be frozen. If it is a single bag, the blood will need to be joined to a transfer bag to become a double bag. This can be done using a connector machine that will connect the two bags via the middle tubing. Tie a knot on the connected tubing to stop blood from flowing from the primary bag to the transfer bag. The double bag is then fold to fit in a centrifuge bucket for centrifugation. This is known as the first spin at 3200rpm for 4 minutes at 20°C. While waiting, we will do some documentation such as the recording the date of freezing, the blood donation number from the bag, the blood group, the quarantine number and the lot number of the Glycerolyte 57 solution bottle used.
After the first spin, carefully remove the blood bags from the centrifuge and place the primary bag on a plasma extractor. Untie the knot in the tubing and the plasma and the buffy coat (i.e. the top layer) will be squeezed out into the transfer bag. Then, while stopping the flow of blood from the two bags using your fingers, place the primary bag on a weighing scale. Fold the transfer bag in such a way that the buffy coat will settle to the bottom and add some plasma back into the primary bag until the weight is increased by 25g. Seal the tubing in between the two bags and dispose the transfer bag. Next, strip the tubing of the primary bag, ensuring no bubbles. Seal to form a segment and remove the segment from the rest of the tubing. Paste a donation number label on a test tube. Cut the separated segment and pour the blood into the test tube. Do a 1:1 dilution with NaCl. Test for the HCT using the automated ADIVA 120 machine. A pass is above 70% and a report is printed out. After that, weigh the blood again. Make sure to tare first with an empty bag. Record the volume of the blood (Volume = Mass/Density).
Place the bag inside a water bath for 30 minutes at 37°C. In the meantime, prepare the set up for the transfer of blood from the primary bag to the freezer bag (2000ml) and the glycerolyte solution. Connect the tubing from the glycerolyte bottle to the freezer bag but do not allow the flow of glycerolyte to the freezer bag by locking the clips. After 30 minutes, remove the bag from the water bath. Clean the needle of the freezer bag with methylated spirit and poke the needle to connect to the primary bag. Hang the primary bag upside down and allow the blood to drain to the freezer bag. After all the blood has been drained, transfer the whole set up to a shaker. Hang the glycerolyte bottle and unlock the clips, allowing glycerolyte solution to flow into the freezer bag and mix with the blood. After adding 100 ml, pause the flow by locking the clips and stop the shaker for 5 minutes. After adding another 50ml, pause again for 2 minutes. Transfer the rest of the glycerolyte solution, giving a total volume of 400ml. Lock all clips so that blood will not flow out of the freezer bag. Seal the tubing between the bottle and the freezer bag and discard the bottle.
Fold the freezer bag into a plastic bag and, together with the primary bag, they are centrifuged at 2500rpm for 10 minutes at 20°C. This is known as the second spin. Again carefully place the freezer bag onto the plasma extractor and squeeze out 50ml of the glycerolyte solution (i.e. top layer). Seal the tubing and discard the primary bag. Strip the freezer bag tubing.
Transform the blood product in the computer system into frozen red blood cells. (i.e. the transformation is done by a freezing laboratory staff as I do not have access to the computer system). Label the blood card with a frozen red blood cells label. Fold the bag in such a way that the tubing will not overlap with each other and place in a metal plate that is labelled with the donation number, blood group, quarantine number and date of freezing. Place the metal plate in the freezer at –80°C, laying it flat so that the blood will not sink to one side.
Some of the difficulties I faced while doing this were tying a knot, stripping the tubing and transferring the wanted volume from one bag into the other as the weight of the weighing scale keep on fluctuating.
Indah
0705361D
Friday, July 10, 2009
Cytogenetics
Hi everyone, I’m Justin here and I’m posted to cytogenetics lab for 20 weeks. The things I learnt are quite interesting as most of the stuff is not taught at school. For week 1 and 2, I’ve been observing procedures; reading documents; and practicing how to pair and arrange chromosomes. This week, I started performing some procedures.
Cytogenetics is the study of chromosome number, morphology, and the abnormalities that can be correlated to diseases. The lab I’m in is classified into 3 areas. Namely, Prenatal, which handles amniotic fluid and chorionic vili for diagnosis of chromosomal disorders ; Bone marrow, which handles bone marrow, bone core, and peripheral blood samples for haematological disorders; and FISH(fluorescence in situ hybridization), which uses specific molecular probes linked to fluorescent dyes to detect conditions eg. deletion syndromes. I’m in the bone marrow area, and will talk about the workflow for producing a karyotype, with some bone marrow specific procedures.
Sample: Bone Marrow/ Bone Core
When the sample arrives and test requisition has been performed, the first part of the process is the culture set up. The samples will be centrifuged and the buffy layer is obtained. 2 cultures will be set up. The type of cultures set up (direct harvest; 24-hr; 48-hr; 72 hr with mitogens) depends on the suspected diagnosis of the patient. The reason is that certain abnormal cell clones can be detected immediately but others need a longer time to grow, hence the need for 2 cultures and disease specific durations. The addition of mitogens (growth factors) allows the stimulation of specific clones. For example, in suspected cases of CLL (chronic lymphocytic leukemia), the 2 cultures set up would be 72-hr with TPA and PHA. TPA and PHA are growth factors specific for B-cells and T-cells respectively. This is so that we can determine the exact cause of the CLL (whether it’s due to B or T cells). For direct harvest, the harvesting process is done immediately (see next step), while for 24, 48, and 72 hour cultures are prepared, by inoculating the buffy coat into complete RPMI 1640 media (used by my lab, contains nutrients for bone marrow cell culture), and incubating them for the respective durations in a 37ºC CO2 incubator. I’ll go into more specific details of culture durations and procedures in subsequent posts.
The next part is the harvesting, which are the processing steps so as to obtain metaphases for chromosomal analysis. The first step is the mitotic arrest. Cell cycle is arrested at metaphase using a reagent known as colcemid. Colcemid inhibits spindle fiber formation by depolymerising tubulin, thus preventing the progress of the cell cycle. The next step is hypotonic treatment. A hypotonic solution (potassium chloride is used in my lab) causes water to enter the cell. This allows cells to swell and allows the chromosomes to spread out for easier analysis. In my lab the colcemid and potassium chloride is incorporated into 1 solution-“direct-harvest media”. The third step is fixation. The fixative used is a modified Carnoy’s fixative (without the chlorofoam?), which consist of methanol and acetic acid in the ratio of 3:1. The purpose of fixation is to harden cells and chromosomes, making them resistant to changes, and allowing for staining. The fixative also destroys debris (of cell clots etc), thus allowing a clearer suspension for easier analysis.
After harvesting, fixed cells are dropped onto slides so that they can be analysed. The slides must be grease and dirt free as other particles may interfere with analysis. The slides are then baked in an oven at 90ºC for 2 hours. The purpose of baking as that it gives better contrast for staining and allows the chromosomes to be stained. For staining, the most common staining method for routine analysis is G banding by trypsin using Giemsa and Wright’s stain (GTG banding). This staining allows chromosomes to be individually identified. The enzyme trypsin allows the staining dyes to enter the chromosomes.
After staining, the slide is sent for analysis. 20 metaphases will be analysed. The use of 20 metaphases is to ensure that an extra chromosome in one metaphase is not due to some random error (eg. overspreading because hypotonic treatment too long). A minimum of 5 metaphases must be karyotyped for analysis. Karyotyping refers to the arranging and pairing of chromosomes in order (1-22, XX or XY) Karyotyping can be done through computer programs or manually, in which the photo of the metaphase is taken and chromosomes cut out by hand (I do that as part of training for identifying chromosomes).
In terms of clinical significance, the use of bone marrow specimens allows for the diagnosis and prognosis of haematological disorders. This is because consistent chromosomal abnormalities will be associated with a particular disease. For example, in patients with Chronic Myelogenous Leukemia (CML), the 9-22 translocation will be observed (t(9;22)(q34;q11)) in abnormal cells. For prognostic information, a change in karyotype will show it. In patients with CML, if an extra chromosome 8; chromosome 19 or Philadelphia chromosome is observed, it indicates progression to the blast crisis of CML, whereby the prognosis is poor and the survival rate for patients is about 2-5 months (refer to MBIO lecture notes topic 5).
That’s all for now. I’ll go into more specific details of each stage in subsequent posts. Sorry for the long post. Enjoy your SIP !
Ng Tze Yang Justin
0703747F
Friday, July 3, 2009
Blood Banking
Hi, Liyana here :)
During my first week I was appointed to the blood banking section.
Once sample is received (in an EDTA tube), it needs to be checked for clotting, if there is clotting, the sample needs to be rejected. If no clotting is observed, the sample will be centrifuged to seperate the RBC portion from the plasma.
The lab uses an automated ABO/Rh typing and Ab screening. The analyzer is known as AUTOVUE Innova which uses the same principle as gel card technique. The sample would be loaded onto the analyzer. The analyzer uses a cassette for ABO/Rh typing, the cassette consists of forward and reverse grouping. The cassette has 6 columns consisting of:
Forward grouping (reagents are readily present in column):
1. anti-A
2. anti-B
3. anti-D
Reverse grouping (reagents will be added to the column):
1. A cells
2. B cells
(note: It does not use O cells)
The last coloumn is used as a control, whereby the probe would add patient's serum and RBC (initially diluted in saline).
The probe would initially suck up the plasma (this is done first to prevent disruption of the sepration between plasma and RBC) and add it to the columns containing A cells, B cells and the control. Subsequently, it would suck up the RBC and dilute it in saline before it is added to columns consisting of anti-A, anti-B, anti-D and control.
The cassette would then be transported to the centrifuge (located within the analyzer as well). It would undergo two type of centrifugation, low speed and high speed. The purpose of low speed is to allow the cells to intereact with the reagents. The high speed is to seperate the agglutinated cells from the non-agglutinated cells. The agglutinated cells would be large and will not be able to migrate to the bottom of the column, settles at the top. However, non-agglutinated cells are small enough to seep through the beads in the column and settle to the bottom.
As for Ab screening, the cassette consists of AHG for detection of IgG Ab. BLISS will be added to each column to lower zeta potential and enhance interaction between RBCs and Abs . Then, S1, S2 and S3 cells would be added to respective columns followed by plasma to each column (plasma is added later to prevent neutralization of AHG). Therefore, Ab screening only makes use of three columns though there are six columns in one cassette (the cassettes can run two different samples). Unlike, ABO/Rh typing, the cassette needs to be incubated for ten minutes before it undergoes centrifugation (both low and high speed). Interpretation of results is smilar to that of ABO/Rh typing.
The analyzer would read the cassettes and determine the patients ABO/Rh group and detect if there are clinically significant Ab present. However, Ab screening result would only appear as positive or negative, it would not be able to identify the Ab if result is positive.
Subsequently, results would be checked against the patient's history. If there are discrepancies or no history of the patient is found, the test would then be conducted again manually for rechecking. The lab uses tube method for ABO/Rh typing (similar to practicals done in school). However, it uses the gel card technique for Ab screening. A same cassette for Ab screening used by the analyzer is used for this method too. The steps for Ab screening using gel card technique are as follows:
1. S1, S2 and S3 cells are added to the three columns respectively.
2. Plasma is added to each column.
3. Incubation
4. Centrifugation
5. Read results; grade accordingly i.e.: 4+, 3+, 2+, 1+, 0
If a crossmatch needs to be conducted, the patient's Ab screening results will determine the type of crossmatch. If Ab screening result is negative, an abbreviated crossmatch is conducted whereby donor's RBC (diluted in saline) is reacted with patient's plasma. However, if Ab screening is positive, a full crossmatch (similar to practicals done in school) needs to be conducted whereby the three phases, i.e: saline, LISS and AHG, needs to be conducted using donor's RBC (diluted in saline) and patient's serum. In addition, if the results is negative in the AHG phase, Coomb's reagent needs to be added by acting as a control to ensure that the AHG is not neutralized by unbound Abs.
Liyana
0703827F
TG01
Sunday, June 28, 2009
Laboratory Information System
I'm attached to the clinical laboratory under the administrative department for the first week. This gives me the chance to learn more and have a first-hand experience of what the LIS is all about. Basically, in our lab, the LIS is linked to both the Hospital Information System and the Central Management System. As everyone of you know, the HIS is all the patients' particulars while the CMS links the LIS to the rest of the clinic under the hospital.
Under the admin department, what we do everyday is to register and bill the samples received, and it is very important to make sure that no samples or tests to be done are left out as this will cause inconvenience to both the lab and the patients. These samples that we received are collected from the various clinics by the respective dispatchs and also from the different departments of the hospital. When we received the samples, it is important to check the various samples against the names on the request forms as human error such as labeling error is often. If a sample that belongs to patient B is registered under patient A, this will cause the results obtained to be invalid. Sometimes, the samples recieved are not the same as what is reflected in the form that the dispatchs use to state the amount of different samples collected. Therefore, we must call the clinics to double check with them about the number of samples sent. There are also times when samples are not received for a particular test, and this is when we will have to call up the clinic and confirm with them about the tests to be done for that patient.
Documentation is also very important in the admin department. Once the tests are being done and results are obtained with the availability of the various reports, the request forms will be sorted and keep according to the date of register for a period of six months in case any clinic calls to enquire about a certain test done on the patient. Any request forms that are dated six months before the current month are being disposed. For the tests reports, the date when the reports are recieved will be documented, and there is always two reports, the original for the patient or clinic and the other or photocopied for the lab. We always keep a photocopied or dupicate report for reference in case the clinic calls and ask for the same report to be faxed to them.
For the first week, all I was asked to do is to register samples for simple tests like anti-HIV, Malaria Prasites, Work Permit and VDRL. I've also prepared reports to be sent to the respective clinics for the dispatch and record the reports received and file accordingly. For this week, I finally know why a systematic and organised documentation system is important as there will always be people calling up to trace for the different reports, regardless of whether the reports have been sent to them. But, it is fun and exciting to be in the admin department! Have a try if you guys are given the chance, because challenges will pop out from no where suddenly!
Hui Juan
TG01
Subscribe to:
Posts (Atom)