When patient requires transfusion or blood on standby, compatibility testing will have to be done.
There are 2 kinds of compatibility testing. Namely, Abbreviated crossmatch (AXM) or extended crossmatch (EXM)
Extended crossmatch will have to be performed when:
1) patient has history of significant red cell Ab
2)Ab screening is positive
3)Patient has a recent episode of adverse transfusion reaction
4)Patient is <4 months old
AXM is performed when patient all 4 EXM criteria does not apply to patient.
For EXM, there are 3 phases. Namely the saline phase, LISS phase and AHG phase.
Saline Phase
1) Add 3d patient serum
2) add 1d 3-5% washed donor cells
3)incubate for 20mins at room temperature
4)Spin down at 1000rpm for 15secs and read
Check for haemolysis and then re-suspend and read under microscope for agglutination.
LISS Phase
1) Add 3d patient serum
2) add 1d 3-5% washed donor cells
3) Add 2d LISS. Mix well
4)incubate for 10mins at 37 degree celcius
5)Spin down at 1000rpm for 15secs and read
Check for haemolysis and then re-suspend and read under microscope for agglutination.
Then we'll proceed to AHG phase
AHG Phase
1) Wash the cells in the LISS tube in 0.9% saline 3 times.
2)Add 2d AHG to the red cell button in test tube
3)Spin down at 1000rpm for 15secs and read
4)re-suspend and read under microscope for agglutination.
If the tube gives negative results, add 1d control cells and then spin again. Should it yield negative results again, test will have to be repeated.
For AXM, these are the steps. It's much easier and takes a shorter time
AXM
1)Label 1 tube for the donor sample to be tested.
2) Wash this donor sample in 0.9% saline.
3)Add 2 drops of patient serum to a clean, labelled tube
4)Add 1 drop of 3-5% washed donor cells to the labelled tube
5)Spin down at 1000rpm for 15secs and read
6)Check for haemolysis and then re-suspend and read under microscope for agglutination.
Purpose of compatibility testing is to select a unit of compatible blood for each potential recipient which will have acceptable survival and will not cause clinically significant destruction of the recipient's own cells. As long as it's possible, units of the same blood group and Rh(D) group will have to be selected for patient.
Since EXM consist of 3 phases, and includes incubation at 37deg, it can better detect IgG antibodies .
yanhong 0703979e
Sunday, November 8, 2009
Tuesday, November 3, 2009
Microplate Technique
Hello everyone. I am sorry for the late post.
In this final post, I am going to share about one technique that I used in my project. I am designing antibody screening panels. This would require a lot of phenotyping of donor cells to create a good quality panel. One of the antigens that must be expressed in an antibody screening panel is the S antigen. This antigen is rare in the local population, with a frequency of 6%. Hence, the objective of this microplate technique is to screen for cells that are negative for the antithetical little s antigen. This means I would select cells that are either homozygous or heterozygous for S antigen to do full phenotyping.
Each week I would receive a batch of samples of about 60 and above. I need to screen all for little s negative antigen. Since the manufacturer insert of my antisera reagent does not recommend to be used for indirect coombs test, I cannot use the Techno TwinStation machine for this phenotyping. Instead, I used the microplate technique at room temperature, which allows screening of huge amount of samples at one go.
Procedures
1. Label all donor samples and position them according to the wells numbering in a rack.
2. Prepare 0.8% red cells suspension of each donor samples. The lower concentration would make it easier to read for agglutination.
3. Add 50ųl of red cells suspension into each well using a disposable pipette.
4. Add 50ųl of diluted antisera (1:1000) using the multi-dispenser pipette. The dilution factor of the antisera is derived from titration prior to the test.
5. Leave the microplate to stand without disturbance at room temperature for 30 to 40 minutes.
6. Record results.
Result Interpretation
If a well were positive for little s antigen, the red cells would form a monolayer suspension with no button formation observed. If a well were negative for little s antigen, the red cells would form a clear and compact button at the center of the well. To ensure valid results, positive and negative controls are used.
Picture retrieved from
http://www.hpa-midas.org.uk/images/page_images/agglutination_assay.gif
Advantages of microplate technique
1. It serves as a good preliminary screening method for phenotyping rare antigens.
2. It can handle large volume of donor samples at one time.
3. Produce rapid and reliable results.
4. Reduce wastage of disposable equipments in comparison to the tube technique.
5. Reduce cost, as the method is reliable for diluted antisera reagent.
Thank you.
Indah.
Sunday, October 25, 2009
Slide Making
Hi everyone, I’m Justin here. Sorry for my super late post. For the last post, I’ll write about slide making.
Slide making involves dropping fixed cell suspension onto slides. Slides are then air dried. The air drying is based on the principle that fixed cells are supported with a thin layer of fixative. When the fixative evaporates, the cell would be pressed down, resulting in the spreading of chromosomes. The rate of fixative evaporation has to be controlled. If evaportation is too fast, a cytoplasmic background will be present and spreading will be poor. If the fixative evaporates too slowly, the weakened cell membrane may lose its integrity, leading to chromosome loss. Thus, the slide making process is able to eventually influence chromosome spreading and morphology.
The main factors that affect the slide making process are temperature, humidity and airflow. Humidity relates to the amount of moisture in the air. If the air is dry, evaporation rate will be faster, while if the air is moist, evaporation rate will be slower. Environment temperature is taken into account together as warm air is able to hold more moisture. The airflow within the area that slides are made affects the speed of drying. These factors directly affect the drying process, thus being the most important factors in a successful slide.
The lab I’m in uses a de-humidifier and the air conditioner for temperature and humidity. Another lab has a slide drying chamber, in which temperature, humidity, as well as air flow can be controlled more easily. It is important to consistently get slides of appropriate quality.
That’s all. Take care. To SIP and MP !
Ng Tze Yang Justin
0703747F
Sunday, October 18, 2009
Mammalian Cell Technology
For my major project, I am required to culture and subculture mammalian cells. The type of cell I am culturing is large lung cancer cells; NCI-H460. This cell line grows best in RPMI medium.
Culturing of NCI-H460 cell line
1. Cryovial containing 1ml of NCI-H460 cells are removed from the liquid nitrogen and thawed in the 37°C water bath.
(Ensure that the cryovial is securely capped to prevent any leakage.)
2. The RPMI medium is warmed at 37°C water bath for approximately 30 minutes.
3. 5ml of the RPMI medium is added into the centrifuge tube.
4. All cells are removed from the cryovial and added into the 5ml RPMI medium.
5. The centrifuge tube is centrifuged at 1000rpm for 5 minutes.
6. The supernatant is removed and discarded into sodium hypochlorite.
7. The cell pellet is suspended in 10ml of RPMI medium.
8. 50µl of the cell suspension is removed and placed into a microcentrifuge tube (for cell counting).
9. The remaining cell suspension is placed into a T-75 flask.
10. 10ml of RPMI medium is added into the T-75 flask.
11. Incubate at 37°C with 5% CO₂.
Cell counting to determine seeding density
1. 50µl of the cell suspension is added into 50µl of trypan blue.
(Trypan blue will stain the dead cells)
2. Mix well by pipetting it up and down slowly.
(Ensure that the tip of the pipette is not placed against the surface to prevent damaging the cells.)
3. 10µl of the mixture is pipetted into the haemocytometer chamber.
4. Viable cells within the four corner squares of the haemocytometer are counted.
5. The cell density is calculated, average number of cells X 2 X 10
6. The total number of viable cells is calculated, cell density X 10ml
7. Clean the haemocytometer with alcohol.
(Ensure that it is not left for too long as the trypan blue will stain the haemocytometer.)
Strict aseptic techniques need to be observed as presence of contamination will prevent the growth of mammalian cells.
Liyana
0703827F
Monday, October 12, 2009
ASOT
ASOT is commonly ordered by doctors whom patient is suspected of having Group A Streptococcus infection. Procedure for ASOT is as followed.
1. A drop of positive control was dispensed onto the 1st test area.
2. A drop of negative control was dispensed onto the 2nd test area.
3. A drop of sample was dispensed onto the 3rd test area using micropipette.
4. A drop of latex reagent was added to the 3 test areas.
5. Sample and reagent were mixed thoroughly using wooden sticks.
6. Test card was placed on electronic rotator for 2 minutes at 100 ± 2 rpm.
7. Test results was observed and recorded.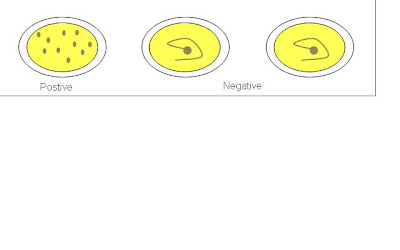
A negative ASOT result does not rule out the possibility of patient having Group A Streptococcus infection. If patient is still suspected of having the infection, a second blood sample should be taken for the test four weeks later from the previous ASOT test day.
Hui Juan
0702012F
Sunday, October 4, 2009
NNJ
In this posting, i'll be talking about NNJ investigation due to ABO incompatibility between the mother and baby.
NNJ - Neonatal Jaundice
Ok. For this investigations, it will be conducted in the blood bank. The nurses will send in a EDTA baby sample and 1 plain tube containing the mother's blood and another EDTA tube containing the mother's blood. So we have 1 tube from the baby, usually the cord blood and another 2 from the mother. These 3 tubes will be sent in a biohazard bag that is attached to the request form.
Mostly NNJ is caused by ABO incompatibility. So the first step is to test for baby and mother's blood group and check if there's incompatibility.
So, if the mother is Group O/A and the baby is group AB/B, there is blood group incompatibility. (Mother has anti-B)
If the mother is Group AB and the baby is group O, there's no blood group incompatibility.
For the baby's sample we only do forward grouping. Reason being: they haven't develop antibody yet.
After we determine that there is ABO incompatibility, we proceed to the "antibody titration stage" We either do the anti-A or anti-B titration with freshly prepared group A or B cells. Like erm, if the mother is Group A, baby group B, she has anti-B, so we do anti-B titration.
It's not possible that both Anti-A and Anti-B titration is required, because if the mother is group O, how can baby be of group AB? Unless the baby is not hers?!
Right. So for the titration we label them from 1:1 dilution to 1:1024 dilution.
1. 3 drops of saline is added into all but 1st tube
2. Into tubes "1:1" and "1:2", we drop 3 drops of mother's serum(plain tube)
3. From tube "1:2" to "1:4" transfer 3 drops over after mixing
4. From tube "1:4" to "1:8" transfer 3 drops over after mixing
5. Keep doing this until the last tube where 3 drops will be pipetted away(from steps 1 to 5, don't wash the pipette. Just keep using the same pipette. This is to avoid further dilution.
6.Then, go over to the fridge, take out a unit of blood of A packed cell(for anti-A titration).
Pull out a segment of blood from the unit.
 See the "tubing-like" rubber structure containing blood, there's a machine which can actually like fuse part of the "tube" together to create a segment, so we can actually pull out a segment without having to puncture and dirty the blood.
7. So to remove impurities, we wash it in 0.9% saline once
8. Then dilute the cells to create a 3-5% cell suspension.
9. Pipette a drop of the cell suspension into all tubes, from 1:1 to 1:1024
10. Incubate all the tubes for 1 hour
11. Centrifuge at low speed, 1000rpm for 15seconds
Read the results. Usually the first 2-3 tubes will be fully haemolysed.
In some tubes, there'll be partial haemolysis, with some agglutinates still present while in some. Record the results. Notify the ward staff/doctor if haemolytic anti-A or anti-B is detected
Thank you!
yanhong 0703979e
Saturday, September 26, 2009
DAT and Elution
Hello.
A sample that is sent to the Red Cell Reference Laboratory for red cell alloantibody identification would have a case history, where it would include the results of the tests that have been previously performed by the requesting hospital blood bank laboratory. Such tests include positive antibody screening or positive Direct Antiglobulin Test (DAT), where further investigation is needed.
A positive DAT may indicate that there are antibodies coating the RBCs. This is usually the case in patients suspected to have haemolytic transfusion reactions, haemolytic disease of the newborn or drug-induced haemolytic anaemia. In such cases, the Red Cell Reference Laboratory staff would have to perform a DAT test to double confirm the result and the strength of the graded reaction submitted by the requesting hospital blood bank laboratory. The stronger the DAT, the more likely it is to be clinically significant.
Test: DAT
Specimen: Blood collected in EDTA tube (purple cap). A clotted specimen collected in a plain tube (red cap) can result in a false positive reaction for the presence of complement due to in-vitro activation of the complement cascade.
DAT test is performed using the gel card technology, where 50 μl of the patient’s 0.8% red cell suspension is added to the microtube column in the ID-DiaMed LISS/Coombs gel card and spun at 910 rpm for 10 minutes. This gel card contains polyspecific AHG reagent to detect IgG and also contains anti-C3d to detect complement. If DAT were confirmed positive, next we would have to find out whether is it IgG antibody or complement C3d or both that is coating the RBCs. We would use an ID-DiaMed DC-Screening II gel card to differentiate the reaction and the steps are the same as the one above. This gel card contains monospecific AHG reagents such as anti-IgG and -C3d. If only C3d were present, an eluate is not likely to yield any useful information and should not be performed in most cases. If IgG were present, we would proceed to do an acid elution.
Elution allows the dissociation of the antibodies from the RBCs cell surface to allow for identification. Acid elution is a relatively quick and easy method and is most suitable for the detection of warm reactive antibody. The washed antibody-coated cells are mixed with a glycine acid solution at a pH of 3.0. The antigen-antibody bond is disrupted and the antibody is released into the acidic supernatant. The supernatant is separated and the pH is neutralised to allow for antibody identification.
The acid elution kit used is called DiaCidel Kit that consists of ready-to-use reagents offering an easy working procedure for the elution of most common antibodies.
Reagents
1. DiaCidel wash solution (concentrated) containing Glycine-NaCl buffer. The working solution can be prepared by diluting the concentrated wash solution with distilled water in 1:10 (i.e. 1ml concentrated wash solution and 9 ml distilled water).
2. DiaCidel elution solution containing a low pH glycine buffer solution with a colour indicator.
3. DiaCidel buffer solution containing Tris buffer with bovine albumin (1.2%).
Test Procedure
1. Wash the red cells which are DAT positive once with isotonic 0.9% saline solution. At least 1ml of packed cells are required.
2. Wash 1.0 of packed cells 4 times with DiaCidel working wash solution.
3. Decant completely after the last wash and keep part of supernatant to test for the presence of irregular antibodies.
4. Add to the 1ml of wash packed cells with 1.0 ml of DiaCidel elution solution. Mix well.
5. Centrifuge immediately for 1 minute at 3000 rpm.
6. Transfer the eluate into a clean tube.
7. Add 5 drops (250 μl) of DiaCidel Buffer Solution to the eluate and mix well. Observe the forming of a blue colour that indicates a neutral pH of 6.5-7.5 us reached. If the blue colour is not obtained, add more buffer 1 drop at a time while mixing.
8. Centrifuge the eluate for 1 minute at 3000 rpm to completely remove any residual cells.
9. Eluate is now ready for testing.
Perform the normal procedure used for antibody identification with the eluate. Use the supernatant solution kept form the last wash in parallel as a negative control.
When you perform the antibody identification with the eluate, you would run an 11-cell panel without including the own patient’s red cells. Confirm the presence of an antibody if the pattern of reactivity matches a pattern of antigen-positive cells. If your DAT is positive but after doing elution and running on the 11-cell panel, the result is negative for all common antibody, we would not proceed on with the investigation. This could be due to many underlying reasons such as hypergammaglobulinemia or drug reactions.
Some links to check out the gel cards and the elution kit that I was referring to:
http://www.diamed.com/product_detail.aspx?id=123&navvis=
http://www.diamed.com/product_detail.aspx?id=122&navvis=
http://www.diamed.com/product_detail.aspx?id=494&navvis=
Thank you.
Indah.
Subscribe to:
Comments (Atom)